In the previous tutorial, we learnt how to host our own server for our bot, so he would be able to fetch data from third party APIs and return it to its users. Alas, the Python server made in the last tutorial was self-hosted: you had to run it on your own computer, using ngrok to expose one of your ports to the internet.
If you closed the terminal running the script, or turned off the computer, the server was shut down and your bot left unable to reply. Hopefully, thanks to services such as Heroku it’ easy to get started with servers.
Meet SATO, the cryptobot
Here’s the end-result of what we’ll build today: a cryptobot aka a chatbot able to fetch any cryptocurrency price.
What you’ll have by the end of this tutorial
In a rush? Here is all you need to build your own:
Need to see it to believe it? That’s wise!

Or if you would rather understand how it was made, go through with the tutorial.
What are we building today?
Today, we’re taking the next step to ensure permanent availability of your bot. By the end of this tutorial, you’ll have your bot server hosted on Heroku and always available, 24/24, 7/7.
This implies some extra steps:
- Hosting your code on a Github repo
- Modifying our server code for Heroku
- Adding extra files to match Heroku’s requirements
- Connecting the Github repo and the Heroku app
- Test and debug
Heroku is nicely integrated with GitHub so this is where the code will be hosted.
I/ GITHUB
This section will focus on using GitHub Bash/CLI (Command Line Interface) to host our code. You can skip this step all together using the visual interface on GitHub website.
1. GIT IN THREE LINES
Github has two major interest for developers: first, it tremendously facilitates collaboration. Secondly, it smoothly handles file versioning. Even if these two advantages may seem remote to you for now, it’s worth it to learn good habits right from the start: GitHub is now a standard.
2. GETTING GITBASH
You can get Git Bash from here.
Note: In the first tutorial, I mentioned about using Chocolatey on Windows for package management. If you did so, you can install Git simply by inputting choco install git in a terminal.
Not only will it install Git, but it will also add it to your system’s path, allowing you to call Git from any terminal. Unlike Ngrok, the Git installer can also add Git to your system path so here choosing between the two installation methods is a matter of preferences.
3. IDENTIFICATION (GLOBAL)
Before we starting manipulating files with Git, we’ll need to set up our email and username. They can be set at a global level or at a directory level. For the sake of simplicity, we’ll set them at a the global level:
git config --global user.email "email@example.com"
git config --global user.name "bobby"
You can confirm both by using the same command without any value:

Verifying username config on GitHub CLI
4. DIRECTORIES
Next, we need to open our project directory (locally). There are many ways to do it.
Using the CLI, you can move between folders with the cd command. You can use tab to autocomplete your input in order to speed up the process:
Navigating folders using CLI
If you need to create a new folder, use the mkdir foldername command
You can also go to your folder using the explorer, and then open a console at the location with SHIFT+Right Click -> Open Powershell Window Here
Now that we have our folder, let’s say /git/ for instance, you can add the file you want to push to GitHub in it. For now, let’s push the server file from the previous tutorial.
First, make sure you are in the right directory in your terminal. Here’s where I’m at:
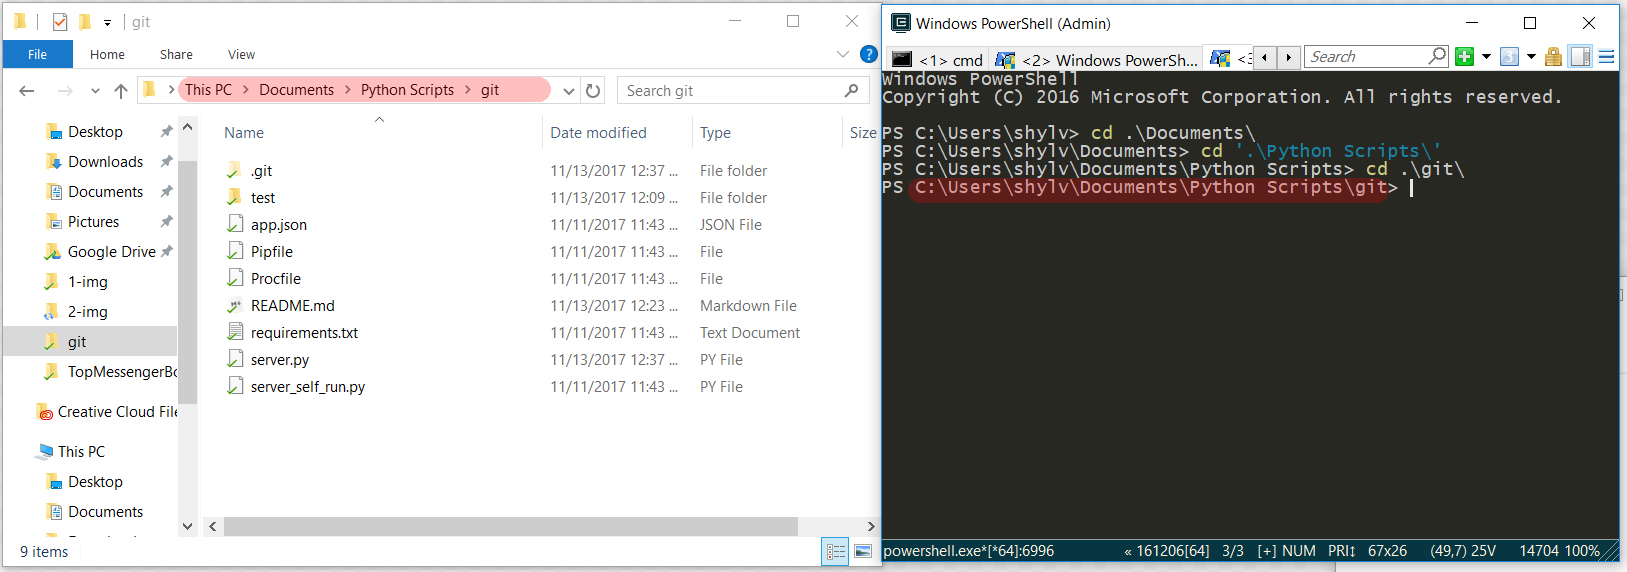
Preparing for the push
5. FIRST GIT PUSH
A git push has several stages. First, you add files to the commit. Then, you commit the changes. Finally, it’s time to push the changes to the remote origin (the GitHub repo).
- To get started, let’s initialize our local repository (/git/ on my screenshot) as a Git repository:
git init - Now, we add the file we wants to push (server.py):
git add server.pyNote: you can add all files in your local repository with the following command:git add . - Then, we commit our changes. To easily keep track of our changes, try to be concise and descriptive in your message:
git commit -m "First server.py commit" - We’re now almost ready to push, once we tell GitHub which repository we want to push our files into. In GitBash language, that’s the ORIGIN:
git remote add origin https://github.com/Ahirice/satoDon’t forget to replace the origin URL with your own github repo. - And verify it:
git remote -vYour repository URL (https://github.com/Ahirice/sato for me here) is displayed at the top of the repository Quick Setup page. If you repository is already published, the repo URL is the URL you use to access it on GitHub. - Everything is set up, now it’s time to finally push:
git push origin master
Here is the whole process in a GIF:
GitHub push GIF
Success! And here went the first push to our GitHub repo, feels good right?

*Step 1/5 – Hosting the code on a GitHub repo*
II/ PREPARING FOR HEROKU: REQUIRED FILES
Before we deploy, we need to add some files to our repository that Heroku requires. Moreover, we’ll have to adjust our server.py script slightly to make it work on this new configuration. Let’s start with the required files:
1. REQUIREMENTS.TXT
During the first tutorial, we installed Requests and Flask using pip. For our remote server to work, it will need these two libraries. This is precisely what the requirements.txt file is about.
Flask==0.12.2
requests==2.18.4
Heroku will process the requirements.txt and install any library listed here in the virtual environment used to run your server. The whole process is automatic, you just need to make sure all your script requirements are listed here.
Note: The state of the art process would have been to create a virtual environment before we began any coding. Then, when deploying to Heroku, we would have frozen our virtual environment requirements to populate our requirements.txt file. For the sake of simplicity, we kept things a little bit easier than they should be.
2. PROCFILE
The procfile is a text file that must be in the root directory of your application. It states the command executed to start your app.
During the first tutorial, we started our local server with python server.py. Here, the command is almost the same. We just need to explicitly state the process type (web) for Heroku, so here’s what we write in our Procfile:
web: python server.py
3. APP.JSON
The app.json file is used to declare standard information about your application, including: name, images, addons environment variables… Heroku offers a comprehensive resource explaining how this file is structured, we invite you to check it if you want to dig deeper.
For now, we’ll just use a basic app.json:
{
  "name": "Sato crypto bot",
  "description": "The server side for Sato.",
  "image": "heroku/python",
  "repository": "https://github.com/Ahirice/sato",
  "keywords": ["python", "flask" ],
  "addons": [ "heroku-postgresql" ],
  "environments": {
    "test": {
      "scripts": {
        "test": "server.py test"
      }
    }
  }
}
Don’t forget to at least edit the repository key value to match your own GitHub repo. The rest can stay the same.

Step 2/5 – Adding Heroku required files
III/ PREPARING FOR HEROKU: PYTHON SERVER MODIFICATIONS
Our server file need slights adjustments to work on Heroku. You can find both files on the GitHub repo:
- server.py is the server script used on Heroku
- server-self-run.py: is the script we used in the first tutorial (and ran ourselves with ngrok)
Essentially, we just need to modify the port and the host of our app. Here’s how:
1. SWITCHING FROM PORT 5000 TO A PORT DEFINED AS ENVIRONMENT VARIABLE
The first and the biggest change we have to do is to modify the port used by our webapp.
In the first tutorial, we hardcoded the port in our script (port = "5000" [line6 in server-self-run.py]). This time, we’ll need to define the port as an environment variable (Heroku requirement). Hopefully, this is done in two simple steps:
- First, to access environment variables in Python, we’ll be using the
os.environfunction . It means we must import os. [line 4 in server.py]. - Then, we need to adapt the line were we define the port:
os.environ["PORT"]fetch the value of the environment variable named “PORT”: we’re almost there. Since ports are integers (=whole number which can be positive, negative or null), we must ensure the port we fetch is indeed one.

Testing the int() function
To do so, we encapsulate our query in the int() function. Therefore, our port is now defined as it follows:
port = int(os.environ["PATH"])
Note: Although we have to import os in our script, it’s not needed in the requirements.txt. Indeed, os is one of the base python library, such as time or sys: these libraries are available as soon as Python is installed.
2. CHANGING THE HOST
There is one last change to do before our server.py is ready. To expose our flask app to the internet (so it can accepts connection from remote sources instead of just local ones), we must set its host as “0.0.0.0.”. We just need to change the very last line of our script:
app.run(port=port, host="0.0.0.0")
3. PUSHING THE NEW FILES TO OUR GITHUB REPO
During the last two steps, we modified server.py and created requirements.txt, procfile and app.json.
Before we move forward with the fifth and last step of the tutorial, we need to push these changes to our repo. Hopefully, we’re now familiar with GitHub’s process. If you have some doubts about the process here, please refer to the first step of this tutorial.
Once we have the updated and newly created files on our GitHub repo, we are ready to deploy to Heroku.

*Step 3/5 – Adapting the server script for Heroku*
IV/ GIT+HEROKU
Now, that we’ve been through the Git process, it’s time for some good news. Heroku offers an easy and potent GitHub integration: once your connect the two accounts, new files pushed on the master repository on GitHub will be automatically deployed to Heroku (unless you rather do it manually).
Note: If the CLI grew on you, or you would rather not connect your Github and Heroku accounts, Heroku also offers a CLI to deploy your servers. It won’t be covered in this tutorial, so we recommend you check Heroku’s Getting Started guide if you want to do it this way.
1. DEPLOYMENT ON HEROKU
The account creation process on Heroku as it’s straightforward so we won’t detail it. Once you have you account, create a new app, and connect to your GitHub account to deploy it automatically. Just follow the GIF:
Deployment options on Heroku
Once automatic deployment is active, every time you push to your GitHub repo, Heroku will deploy the new files to your server.
If you would rather deploy manually but still benefits from the convenience offered by the GitHub<->Heroku integration, you can use the Manual Deploy option (click on the Deploy Branch button). If you do so, remember to go back on Heroku and click this button every time you update your code. Here’s a GIF:
2. CONNECTING YOUR HEROKU APP TO SAP Conversational AI
Once your app is deployed on Heroku, the only thing left to do is to tell SAP Conversational AI where to find it.
- Go on your app on Heroku, on the settings tab, and scroll down to the Domain and Certificates section. Under the domain entry, your app endpoint is displayed. Essentially, it’s your app name (on Heroku) .herokuapp.com. Copy it.
- Now go back on SAP Conversational AI, in settings, and paste your Heroku app URL in the Bot Base URL field.

Step 4/5 – Push deploy the new server on Heroku
V/ TEST AND DEBUG
Now, before we go on Messenger to test our bot, let’s access the logs. They’ll prove helpful if you don’t get it working right the first time.
1. ACCESSING HEROKU’S LOGS
You have two main ways of accessing Heroku’s logs:
From Heroku website: if you click on the More button, at the top left on Heroku, you can access your server logs.
From any terminal: if you have installed Heroku CLI (available on Chocolatey of course), you can access your logs from any terminal.
You can access the logs in real time with the following command:


*Step 5/5 – Running the server script and accessing the logs*
With access to the logs, we’ll have all we need to debug in case of a faulty script. Let’s have a look at the common issues:
2. COMMON ISSUES:
TRAILING / IN BOT BASE URL

Errors raised by an extra trailing slash
Since we set up the webhook our bot call as /, we must make sure the the bot base URL address we pasted does not have an ending /: https://flask-sato-server.herokuapp.com. Here on the screen, we have a trailing slash in the bot base URL, which leads to a POST request on https://flask-sato-server.herokuapp.com// unable to be processed triggering a redirect (301) and method not allowed (405) errors.
NO RESPONSE ON SERVER AND NGROK
If nothing happens both on your server and on ngrok, it means SAP Conversational AI can’t reach it. It’s most certainly due to a typo in the bot base URL, or the complete lack of it.
SLOW RESPONSE TIME
Heroku put your app to sleep when they’ve been inactive for a while. Hence, the first user who aks a crypto price after a long downtime might wait a while. You can upgrade your account to avoid this, or make another script to keep your bot server always up. It’s a great follow-up exercise.
You’re very welcome to contact us if you need help, trough the comment section below or via Slack.